“Average” Self-Defense Shooting Distances

A common phrase heard about self-defense shootings is that “they occur, on average, at 3 yards, happen under three seconds, and take three shots.”

Now, this sort of thing has never been backed up by any reputable research data, though there IS definitely data showing that many self-defense shootings occur within one car-length’s worth of distance. But because of this “commonly known” phrase, many people think that practicing for further distances isn’t useful. (Some instructors go so far as to say “if you are shooting over 15 yards, you should be running away, not fighting” and other similar comments.)

Between the concepts of “acceptable combat accuracy” and “average self-defense distance,” many people’s idea of what they should hold as standards for effective gun skills often end up being “hit a silhouette target at 9 feet, and you are GOOD!”

The problem with that, of course, is that it is nonsense.

We DON’T know the “average” distance for defensive gun uses, because there isn’t any overall research data repository that records this data. We DO know, however, that people have engaged criminals from bad-breath distance up to 100 yards, with a pistol, under justified circumstances.

So why the huge range?

Because all self-defense situations are not the same—and a SIGNIFICANT indicator of what distance you may need to be able to manage is based on who exactly is being threatened.

It is certainly true that someone trying to directly kill you (specifically YOU), generally does so from up close. As such, most self-defense situations of this type do tend to strongly match the “within a car’s length” distance, according to what data we have.

However, the situation in which that distance may be much farther is when you are caught up in a mass shooting situation. The criminal isn’t specifically only attacking you. Instead, he is attacking everyone. You are under threat, but it is likely to be from a distance AND you might not even be the target at that specific moment.

For those citizens who are armed and decide to attempt to stop the attacker, the distances involved are likely to be significantly larger in a mass shooter situation than in a direct assault.

The good side to that is that the shooter is likely to not be directly shooting at you at that point in time, so you have a good chance to make your first shot COUNT.

The question is, have you only practiced “combat accuracy” at 3 yards?

Or have you actually worked on your shooting skills?

Sgt. Johnson made a one-handed shot at 104 yards while holding the reins of two horses. Eli Dicken made 8 of 10 shots from cover/concealment (opinions vary) at 40 yards braced against a pillar. Jack Wilson made a headshot at 12-15 yards.

No matter WHAT situation you find yourself in, you need to make that first shot count–no matter the distance.

And no matter what someone tells you, “three shots, three yards, in three seconds” may not be good enough.

New IDPA Ruleset in 2022

IDPA has recently released an updated ruleset for matches, and there are some SIGNIFICANT changes to it. IDPA released all of the information in a post on their Down Zero blog, and that post contains a short presentation of the major changes, some changelog files, and of course the updated copies of new match rules, and match administration rules. If you shoot IDPA, you are DEFINITELY going to want to go look through those carefully.

Here’s the link: New Rulebook, MAR, and Equipment Appendices

What follows is some commentary on the major changes that you might want to know from a competitor perspective. There are also a lot of changes from a match/stage design perspective, but we’ll be concentrating on the main points of what shooters need to know when they shoot stages.

Main points:

Division capacity changes: SSP shooters may now load 15 rounds into their magazines, and CCP goes to 10 rounds. (If your CCP gun doesn’t hold 10 rounds, remember that the rules say that you load to the max capacity of your smallest magazine.)

Equipment placement changes: AIWB is now legal! In addition, OWB holster placement no longer has to be precisely on the midline of the shooter, but may range from 2 o’clock to 4 o’clock for right handed shooters and 10 to 8 on left-handed shooters. In addition, drop/offset holsters are now legal, provided 1) the butt of the gun stays above the belt, 2) all equipment is concealed by the cover garment when arms are outstretched, and 3) the firearm can’t angle outward from the body farther than vertical, and 4) the gun must have a neutral or muzzle-rear cant.

In addition, the rules defining where exactly you must place magazine pouches (and moonclip/speedloader pouches) have disappeared–the rule now is merely that all equipment must be concealed by the cover garment from all directions during the standard test of hands outstretched at sides.

Equipment modification changes: There were a number of them, but many are division-specific. If your gun was legal before, it still is, but if you plan on doing further modifications please make sure to take a look at the updated rules and appendices. One MAJOR change for everyone: weapon-mounted lights are now legal. If it is concealed and turned off at the start of the stage, it is good to go.

Reloading rules change: FINALLY, you don’t have to retain empty mags. The new rule simply states that any ammunition holder with ammo in it needs to be retained during a reload. That’s it. So as long as the mag is empty even if you still have one in the chamber, drop the mag and don’t worry about it.

And the last main shooting rule change: Sweeping of the shooter’s own body below the belt while removing the firearm from the holster or holstering of the firearm, provided that the shooter’s trigger finger is clearly outside of the trigger guard is not grounds for disqualification. (After the muzzle of the firearm is clear of the holster and has rotated up on the draw, sweeping any part of the body is a DQ.)

Those are some significant changes–and as I said, those aren’t all of them. There are many more, though most of them have to do with stage design, target presentations and setup, and so on. But there ARE some other little details, so again—take a look at the new rules!

(Personal annoyance: I just got done making a set of informational videos on the main rules of IDPA for people just starting the sport. And now I have to go redo them! But in general, I find most of these rule changes to be good things that will make the sport better, and more fun.)

Saving Time in IDPA

Scoring in IDPA is all about time–and while most people concentrate on the shooting aspects (because poor shooting penalizes you with additional time) many people new to IDPA don’t realize that much of the time spent on an IDPA stage consists of non-shooting moments. (On most stages, at least.)

And there are things you can do to save yourself time during those non-shooting moments! ANY time you save on a stage makes your score better–which means that doing something as simple as setting up a reload to be taken on the move to a new position instead of later as a standing reload, can have a HUGE effect on your overall score.

So here is a basic, non-exclusive list of some of the things you can do to save time during the non-shooting moments of a stage in IDPA (and it obviously relates to USPSA and ICORE also):

  1. Be proactive about your reloads. Any time you have a standing reload, you are wasting time, period. A standing reload is almost always the worst choice possible. As such, set up your stage plan so if you burn an extra round on one array you can reload on the move so as not to have a standing reload on the next array. Similarly sometimes if you perform a tactical reload while on the move to the next array you won’t have a standing reload on that next array. Those will all save HUGE amounts of time! For a discussion about how that works, take a look at one of my prior posts about reloads in IDPA.

  2. Do everything while moving except for the shooting parts–and sometimes do the shooting parts on the move, too. At the start of the stage, if you have to draw and take two steps into the first shooting position? Draw while moving. Or perhaps the first targets are taken “in the open” before you advance to the first shooting position? Draw while moving, then if your skills are sufficient to get good hits, shoot while continuing to move toward the next shooting position. You get closer to the targets as you shoot them, and also will be closer to the next shooting position when you finish shooting the targets in the open. Take advantage of any motion you can perform to save time–and if you have to do other things while moving, do them! After all, you are going to have to move anyway, so you might as well save time by getting other things done also.

  3. Be ready to shoot as you enter the next shooting position. All too often, you will see shooters quickly move to the next shooting position, then stop and bring the gun up to shoot. Instead, AS you enter the next shooting position bring your gun up to your eye-line and be ready to shoot the minute your eyes/gun clear cover and the targets are available. This also means that when you enter a shooting position, enter into the stance you will be shooting from. (You will see plenty of people run to a shooting position, stop, drop into a shooting stance, then bring the gun up to shoot. This takes MUCH longer than if you step into your stance while bringing the gun up AS you reach the shooting position.)

  4. Similarly, enter a shooting position with the intent to LEAVE. Place yourself in a mobile stance when you enter the shooting position so that the moment you are finished, you MOVE and head to the next shooting position. Again, often you will see people finish at one position, lower the gun, shift their stance (perhaps after one last look at the targets they just shot) and THEN finally leave for the next shooting position. That takes SO much longer than shooting from a movement position and leaving as the gun recoils from your last shot on that array.

  5. Do all non-shooting things as quickly as possible. When shooting, sometimes you need to take more time to carefully hit your targets–but when you AREN’T shooting, there is no reason to do anything at any other speed than “as fast as you possibly safely can.” Move at maximum speed. Draw as quickly as you safely can. Reload at your top speed. Shoot ONLY at the top speed at which you can get down-zero hits—but do everything else as quickly as possible.

  6. Do everything you can legally do to save time. Follow the rules–but within the rules, do everything you are legally allowed to do to minimize your stage time. They want you to start with all mags on a table? Find out if you have to pouch them all, or can just pouch one, load one, and move on. You want to reload after that first array (after starting with mags on a table)? Find out if the table is considered to be a magazine retention space so you can do a tac reload before moving and just drop the old mag on the table without having to pocket it. (You should be able to—the mags started there, so it should be a mag retention space.) Or perhaps the start position has the loaded gun on the table, and says “hands touching the table”? Then put your hands right next to the gun, immediately ready to pick it up. Start position says “holding paper in both hands”? Ok, do that, but put your hands right next to your cover garment to more easily sweep it out of the way to draw.

Little things add up over the course of a match. If on each stage you do something that saves you only one second—over the course of a major match you can save yourself 10 seconds. And in the last major match I shot, the difference between first and third place was less than 10 seconds. (I was unfortunately none of those.)

Overall—when you come up to the stage, think through your stage plan and see where you can do the non-shooting portions faster. You’ll be amazed at how much difference it makes to your stage results!

Reloads in IDPA: Saving Time

In IDPA, all scoring is time-based, which means that doing well in IDPA is all about saving time. One of the ways you can do this is by carefully planning when you do your reloads, so that you don’t ever end up with a standing reload at some point on a stage.

Now, on Limited stages you have to do exactly what the stage briefing requires, so you don’t have much choice–you follow the WSB precisely, even if that means a standing reload. (In a standing reload, that’s literally what is happening–you are standing there reloading, with nothing else useful going on. The reload is purely adding time to the stage.)

On Unlimited stages, however, you have more choices–and a good choice to make is to reload while you are doing something else, like moving to a new position. You were going to be taking the time to move anyway, so performing a reload during that movement doesn’t add any extra time.

Since there are only two kinds of allowed reloads in IDPA (the Tactical reload and the Emergency reload), you have to think carefully about which you are going to do as part of your stage plan. Both types of reloads have their issues–tactical reloads take more time since you have to retain the magazine and can’t simply drop it and move on, while emergency reloads can only occur after you’ve run the gun completely dry.

So how do you choose what to do?

Emergency reloads require making sure you can run the gun dry at the correct moment in time. Remember, on Unlimited stages you can shoot as much as you want–so the trick is to normally add an extra shot or two at the end of an array (and yes, you have to actually be shooting AT legit targets with your extra shots) so the gun runs dry right before you leave that position and head to the next. As you start moving, you start your emergency reload.

That way you aren’t adding any extra time to your stage run–you are reloading while you are doing something else that you had to do anyway.

Sometimes, it is worth it to burn two or even three rounds, to set up an “emergency” reload when you want it to happen. More than that, though…sometimes it is faster to make the choice to perform a tactical reload instead. You have to figure that out based on your own reload skill level, and what is happening on the stage.

Tactical reloads should be used in places where you are already going to be burning significant time by moving (remember, tac loads take longer) AND where you can’t burn all the extra rounds needed to run the gun dry for an emergency reload.

If the choice is “shoot 2 then burn FIVE extra rounds then do an emergency reload as you move to the new position” versus “shoot 2 then tac reload as you move to the new position” the tactical reload choice is probably going to be faster.

Again, for any given stage, your choices are going to come down to your own personal skills on reloads, and how many rounds you need for each position. Often, burning an extra round or two then making an emergency reload is the way to go. But sometimes, the tactical reload is just going to work better.

Remember, when deciding what choices you are going to make: Make the ones that save you the most time on the stage!

Shooting the IDPA 5×5 Classifier

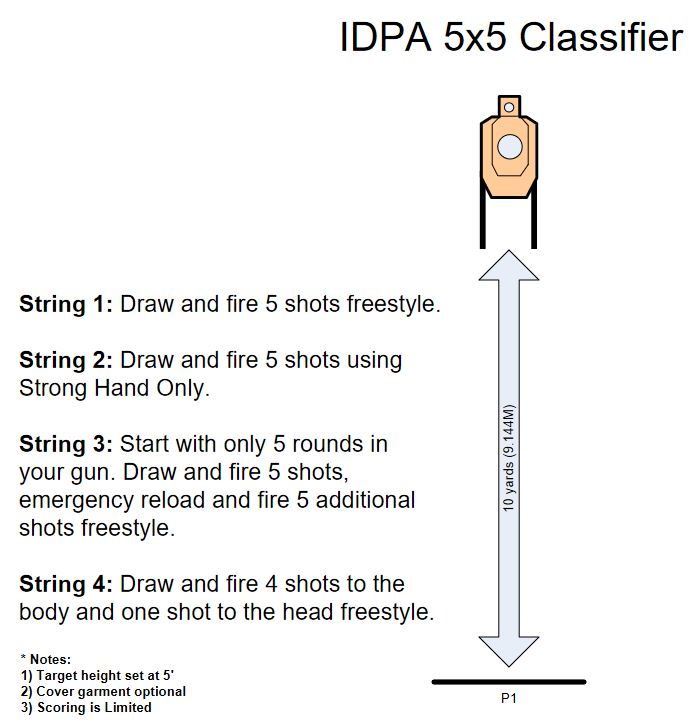
The IDPA 5×5 Classifier was introduced not long ago as a way for competitors (and ranges) to quickly get competitors through the classification process. The original Classifier Match (which is still available for IDPA members, if they can find a club that uses it) is considerably longer, requires more range equipment (and more range space), tests more skills, and requires significantly more ammunition. Unsurprisingly, lots of local clubs have shifted to using the 5×5 classifier for their members instead.

The entirety of the 5×5 classifier is shot at a single IDPA target at 10 yards. It consists of 4 strings, taking a total of 25 rounds to finish the course of fire. Concealment is NOT required, and it is Limited scoring, so be sure to ONLY shoot exactly what the stage briefing specifies.

If you want to be completely prepared to shoot the 5×5, you should come to the line with a holstered gun and at least one mag pouch (for the one on-the-clock reload that is required), no concealment garment, and 5 magazines, one of which is loaded to exactly 4 rounds. If you do that, you will simply reload to a new magazine on every string, making sure that you start string 3 with the magazine that only has 4 rounds in it. (After the first string, you’ll always have one round left in the chamber when you load for the next string, so that gives you five rounds at the start of string 3.)

If you don’t have enough magazines to load a new one each time, you can get away with not reloading between strings 1 and 2, and also 3 and 4, IF you are allowed a magazine capacity of 10. If not—you need to reload to a new magazine between each string. If you don’t have five magazines, have a friend stand behind the firing line, and hand mags back to them so they can reload them for you while you shoot.

As you can see, you need to be able to shoot freestyle, shoot strong-hand-only, and be able to perform a slide-lock reload on the clock. Oh, and hit a headshot at 10 yards on the first try, as no makeup shots are allowed.

And yes, you CAN ask the SO between strings of fire what you are supposed to be doing for the next string–that’s perfectly legal.

Good luck on your classifier run!

Introduction to IDPA Competition

So, you’ve heard about an IDPA match being held nearby, and want to give it a try. But…you’ve never done it before. What do you need to know to get started? What gear do you need? How do you sign up? What match procedures are standard? What are the basic rules for how the match goes?

What follows is not a comprehensive walk-through of all the rules and procedures for IDPA–but it should give you what you need to safely manage your first match. Because that’s the point of the first match, really—completing it safely. If you are SAFE in your first match, you’ll enjoy yourself and you’ll know what sorts of things you need to do to go back and do even better in your next match. So…your goal in your first match is to be safe, and not get disqualified.

So, how do you get started?

1) Registering for the match:
These days, most matches have their registration set up on Practiscore.com. If you plan on shooting matches of any type, you might as well click on that link and go ahead and register for a free account.

Most places who hold matches will literally give you a direct link to their match registration. Or, you can search “Matches” in Practiscore, and find it that way. You can also just search for clubs in your area that are holding matches.

For example, if you want to shoot IDPA near Omaha, The Marksman Indoor Range and Inner 10 both hold monthly matches (on different days, so that you can do both!) and you can find them both on Practiscore:

The Marksman: https://practiscore.com/clubs/idpa_at_marksman_indoor_range
Inner 10: https://practiscore.com/clubs/idpa_omaha

(If you are near Lincoln, Thunder Alley also holds IDPA matches. Search them out!)

Take a look at the divisions in the IDPA Rulebook so that you know what division to sign up for. If you aren’t an IDPA member yet, your “class” will be UN for “unclassified.”

2) Going to the match:
First things first: If you show up with a loaded carry pistol, always immediately contact a range safety officer so they can take you into a bay to unload and show clear. IDPA matches are almost always held on cold ranges, so you should not have a loaded firearm unless you are on the line shooting the stage.

The match will have a defined “Safe Area” in which you can handle firearms. However, no ammunition handling is allowed in the Safe Area. So, when you come to the range, you can gear up with your holster and mag pouches pretty much anywhere, then walk to the Safe Area to take your pistol out of its bag and holster it. (Cleared and empty.) You can also practice draws and dryfire in the Safe Area, along with any gun maintenance that needs to happen. But NO AMMUNITION HANDLING. (Because that’s a DQ offense, and you don’t want that to happen.)

You can load magazines and handle ammunition (though obviously, not putting any in the gun) anywhere ELSE on the range that isn’t the Safe Area.

If you have ANY questions about safety procedures and so on, ASK. The range staff and the match safety officers would really prefer not to have to DQ anyone. But safety is important–if you break a safety rule, you’ll be done for the day. (Whereupon we want you to go home and practice safe gun-handling some more, but definitely want you to come back and try it again.) When in doubt, ask a question.

3) What gear do I need to shoot an IDPA match?
The nice thing here is that the gear/equipment needed for IDPA is pretty minimal.

4) How are IDPA matches scored?
That’s pretty straightforward also.

5) What is this “Tactical Priority” I keep hearing about regarding how to run a stage?
Okay, that part is a little more complicated. Once you practice it a couple of times, however, it ends up being pretty straightforward–and it makes most stage plans very easy to figure out.

6) What other rules should I probably know for my first match?
Like an sport, IDPA has a number of rules, but with the above knowledge, plus one last video about allowed reloads, you should be pretty solid for your first match.

7) Anything else in particular, safety-wise, that you should carefully practice before going to an action match like IDPA?
Watching your 180, keeping the finger out of the trigger guard unless actively engaging targets, and making sure you don’t sweep anything is VERY important.

The main thing is….sign up for a match, get the gear you need, and come out and give it a safe, careful try. People will be more than happy to help you and answer questions–and once you’ve tried it once, you’ll realize that you want to keep doing it, and you’ll have the information you need to start getting better at it.

Come out and shoot!

A Realistic View of Crime in Nebraska

Several years ago I wrote an article about Crime Definitions You Should Think About, talking about the definition of “Aggravated Assault” (as opposed to “Attempted Murder”) and what it meant—and how often it happened.  If you haven’t read that, please take a moment to do so, because it describes the definition of aggravated assault, and why that definition is important.  It’ll make the next part a lot more clear.

Each year, states (and divisions within that state such as county and city departments) are required to report crime statistics in various ways.  One of the most important “indexes” of crime are “Part I” crimes, which include (among other things) the various categories of “Violent Crimes” which are:  Criminal Homicide, Rape, Robbery, and Aggravated Assault.

Most often, people  (when talking about armed self-defense) discuss the criminal homicide rates in their various areas, touting those areas as “safe” or “dangerous” in various descriptions based on those rates, most of which are misleading at best, and downright wrong fairly often.

Continue reading

How do you gain knowledge?

In a past post, I talked fairly bluntly about how if you don’t have any education, training, or experience in a technical area, you don’t really have a right to an opinion in that technical area.

Unsurprisingly in this time of “everyone is equal and their thoughts are all equally valid, even if they are clueless,” lots of people grew angry about the idea.  It probably would have gone better had if I said it differently, but what I was REALLY thinking was “…your opinion is worthless.”

And I wasn’t wrong.

So how do you get to a point where your opinion is valid in a technical area such as self-defense?  Answer:  Education, training, or experience. (And preferably, all three.)

Let’s start with education (this will be the first in a set of three posts). Continue reading

Why make match videos?

Awhile back, someone asked me why I keep making match videos.  It occurred to me that from the outside, it probably just looks like I’m posting them so people can watch me shoot–and that’s very much not the point.  (Quite frankly, there are a number of stage attempts that I’d rather people didn’t see!) Continue reading

Useful Shooting Accessories, Part I

I’ve been meaning to write a couple of articles listing a number of the useful gadgets and accessories I’ve picked up over time that help me when I’m out shooting. I use these things, and I feel they have really helped make my life easier—whether practicing, competing, or carrying.  In a later post I’ll also talk about what I’ve found that you should NOT use. Continue reading